
INTRO

kotlin으로 개발한 안드로이드 환경에
Firebase Cloud Messaging 서비스를 연동시켜 볼 것이다.

| 1. Android 프로젝트 생성 |
--> Empty project로 테스트 할 것이다.

-->프로젝트명과 패키지명을 입력하고 프로젝트 생성

| 2. Firebase Project 생성 |
-->구글 Firebase 콘솔에 접속하여, 프로젝트를 생성한다.

--> 프로젝트 이름을 입력한다.

-->google 애널리틱스는 선택사항.

--> 프로젝트를 생성했으면, 이제 APP을 추가한다.

--> 아까 생성한 Android 프로젝트의 패키지 이름을 입력한다.
--> 패키지명은 AndroidManifest.xml 파일의 맨 위 태그인 manifest태그에서 찾을 수 있다.

org.techtown.pushtest
--> 닉네임은 선택사항.
--> push 기능을 사용하려면 SHA-1 Key를 필수로 입력해주어야 한다.
--> 이를 알아보는 방법은 아래 포스팅 참고
https://rangsub.tistory.com/108
[Android] SHA값 추출
INTRO 안드로이드 앱을 Firebase, Google map 등의 API와 연동시킬 때 필요한 SHA Key를 추출하는 방법에 대해 알아본다. 1. 명령 프롬프트 실행(CMD) --> 명령 프롬프트를 실행하고 아래 경로로 이동한다. -->.
rangsub.tistory.com
--> 모두 입력 후 앱 등록 버튼 클릭

--> 다음으로 구성 파일(json)을 다운로드하고, app 폴더 내 root 디렉터리에 추가해준다.

--> 다음으로는 프로젝트 수준의 build.gradle 파일에 Firebase 관련 값들을 넣어준다.

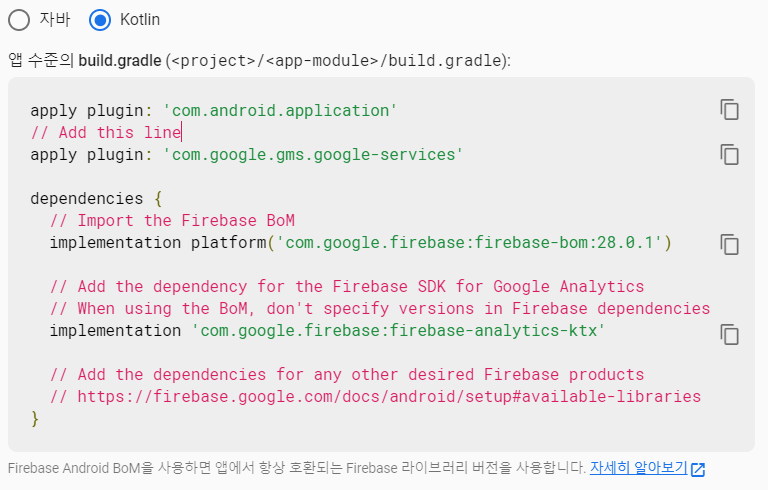
--> 다음은 APP 수준의 build.gradle 파일에 의존성을 넣어준다
| 3. 클래스 생성 |
-->아래와 같이 MainActivity 가 있는 패키지에 MyFirebaseMessagingService라는 .kt파일을 하나 생성한다.

-->아래와 같이 입력해준다.
package org.techtown.pushtest

import android.app.NotificationManager
import android.app.PendingIntent
import android.content.Context
import android.content.Intent
import android.media.RingtoneManager
import android.util.Log
import androidx.core.app.NotificationCompat
import com.google.firebase.messaging.FirebaseMessagingService
import com.google.firebase.messaging.RemoteMessage

class MyFirebaseMessagingService:FirebaseMessagingService() {
    private val TAG = "FirebaseService"

    /**
     * FirebaseInstanceIdService is deprecated.
     * this is new on firebase-messaging:17.1.0
     */
    override fun onNewToken(token: String) {
        Log.d(TAG, "new Token: $token")
    }

    /**
     * this method will be triggered every time there is new FCM Message.
     */
    override fun onMessageReceived(remoteMessage: RemoteMessage) {
        Log.d(TAG, "From: " + remoteMessage.from)

        if(remoteMessage.notification != null) {
            Log.d(TAG, "Notification Message Body: ${remoteMessage.notification?.body}")
            sendNotification(remoteMessage.notification?.body)
        }
    }

    private fun sendNotification(body: String?) {
        val intent = Intent(this, MainActivity::class.java).apply {
            flags = Intent.FLAG_ACTIVITY_CLEAR_TOP
            putExtra("Notification", body)
        }
            .0

        var pendingIntent = PendingIntent.getActivity(this, 0, intent, PendingIntent.FLAG_ONE_SHOT)
        val notificationSound = RingtoneManager.getDefaultUri(RingtoneManager.TYPE_NOTIFICATION)

        var notificationBuilder = NotificationCompat.Builder(this,"Notification")
            .setSmallIcon(R.mipmap.ic_launcher)
            .setContentTitle("Push Notification FCM")
            .setContentText(body)
            .setAutoCancel(true)
            .setSound(notificationSound)
            .setContentIntent(pendingIntent)

        var notificationManager: NotificationManager = this.getSystemService(Context.NOTIFICATION_SERVICE) as NotificationManager
        notificationManager.notify(0, notificationBuilder.build())
    }

}
--> 이후 AndroidMenifest.xml의 <activity>태그 아래에 다음과 같이 <service>태그를 추가해준다.)
        <service
            android:name=".MyFirebaseMessagingService"
            android:exported="false">
            <intent-filter>
                <action android:name="com.google.firebase.MESSAGING_EVENT" />
            </intent-filter>
        </service>
--> 여기까지 하면 모든 설정이 끝난 상태.
--> 이제 APP을 빌드하고, 안드로이드 폰에서 실행한다.
--> APP이 정상 실행되는지 확인한다.


| 4. firebase에서 push 날려보기 |
-->firebase console에서 cloud Messaging 탭에 들어간다.

--> 새 알림 버튼을 눌러 Push 정보를 입력한다.
--> 테스트메시지는 날리지 않는다. 우선 push 기능 테스트가 목적이므로.
--> 적당히 입력 후 다음 버튼 클릭

--> 아까 생성한 app을 선택하고 다음

--> 다음 보낼 시간을 선택한다. 지금 보낼것이므로..(다른 시간에 예약도 가능하다)

--> 전환 이벤트와 추가 옵션은 아무것도 입력하지 말고 넘어가자

-->검토 버튼을 누르고, 게시를 눌러준다.

| 5. Android APP에서 Push 확인 |
--> 아래와 같이 정상적으로 Push가 오는 것을 확인할 수 있다.

마무리
Android Kotlin 환경에서 FIrebase를 이용하여 Push 이벤트를 발생시켜보았다.
이를 활용한 다양한 프로젝트가 가능할 것으로 보인다.

-퍼가실 때는 출처를 꼭 같이 적어서 올려주세요!
'DevOps > [Firebase]' 카테고리의 다른 글
| [Firebase] Google Login 붙여보기(With Vue.js, Github Pages) (3) | 2021.05.10 |
|---|---|
| [Firebase] Vue.js 앱을 Firebase Hosting 기능을 사용하여 배포하기 (0) | 2021.04.02 |

