
@RunWith
@ContextConfiguration
@Autowired
@Resource
어노테이션은 의존하는 객체를 자동으로 주입해주는 어노테이션이다.
정밀한 의존관계 주입이 필요한 경우 유용하다.
Autowired는 변수, 세터메서드 생성자, 일반 메서드에 적용가능
의존하는 객체를 주입할 때 주로 TYPE을 이용하게 된다.
Autowired는 <property><Constructor-arg> 태그와 동일한 역할을한다.
@Autowired은 타입으로, @Resource는 name으로 주입하는 것이 차이이다.
이 어노테이션들의 역할..
package myspring.di.xml.test;

import org.junit.Assert;
import org.junit.Test;
import org.junit.runner.RunWith;
import org.springframework.beans.factory.annotation.Autowired;
import org.springframework.test.context.ContextConfiguration;
import org.springframework.test.context.junit4.SpringJUnit4ClassRunner;

import myspring.di.xml.Hello;

@RunWith(SpringJUnit4ClassRunner.class)
@ContextConfiguration(locations = "classpath:config/springbeans.xml")

public class HelloBeanSpringTest {
	// 이 아래걸 대체하는 어노테이션이 @ContextConfiguration
	// BeanFactory factory = new GenericXmlApplicationContext("config/springbeans.xml");
	@Autowired
	Hello hello;

	@Test
	public void setterInjection() {
		Assert.assertEquals("Hello스프링이다.", hello.sayHello());
		System.out.println(hello.sayHello());
		hello.print();
	}

}
그리고.. Hello의 기본생성자를 막아보자.
springbeans.xml에 가보면 에러가 난다.
그니까 아래 이 소스는 기본생성자에 맞는 xml 소스이다.

매개변수가 있는 생성자를 사용하려면 아래와 같이 써줘야댄다
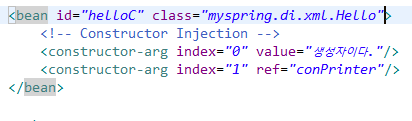
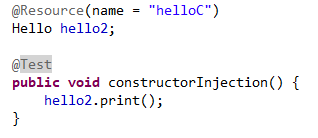
찍어보면 constructorInjection에 대해 이해할 수 있다.
여기까지가 전략 1이었다..
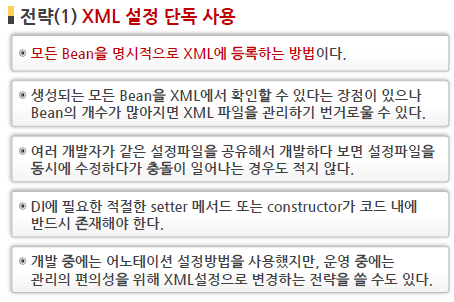
XML에 bean 만드는게 귀찮고 답답하다! 그래서..
전략2로가자...
전략1에서 했던 SetterInjection을 전략2로 바꾸면..
StringPrinter 클래스..
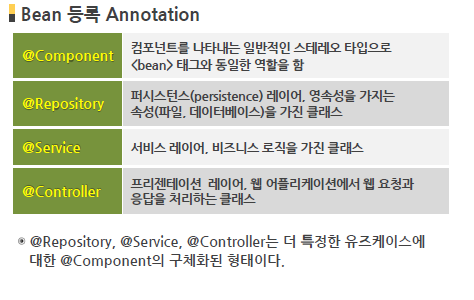
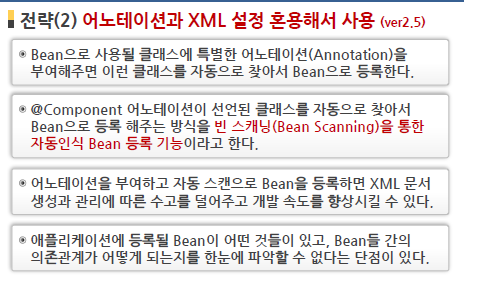
@Component 어노테이션이 쓰인 것이 보인다...
이것은 xml에서 작성 안하고 여기다가 써주겠다... 라는것이다..
package myspring.di.annot;

import org.springframework.stereotype.Component;

@Component("stringPrinter")
// 이렇게 썼을 것이다. XML에..
//<bean id="StrigPrinter" class="xxx.StringPrinterBean" />
public class StringPrinterBean implements PrinterBean {
	public StringPrinterBean() {
		System.out.println("String Printer Default Constructor");
	}
	StringBuilder builder = new StringBuilder();

	@Override
	public void print(String message) {
		this.builder.append(message);
	}

	@Override
	public String toString() {
		return this.builder.toString();
	}


}
ConsolePrinter 클래스
마찬가지로 Component annot가 쓰였다.
package myspring.di.annot;

import org.springframework.stereotype.Component;

@Component("consolePrinter")
public class ConsolePrinterBean implements PrinterBean {
	public ConsolePrinterBean() {
		System.out.println("Console Printer Default constructor");
	}

	@Override
	public void print(String message) {
		System.out.println(message);
	}

}
Hello 크래스
여기도 Compnent annot 쓰였고.. 그리고 name 과 printer변수들 위에 어떤 어노테이션이 있는지 보면.. 된다.
package myspring.di.annot;

import org.springframework.beans.factory.annotation.Autowired;
import org.springframework.beans.factory.annotation.Qualifier;
import org.springframework.beans.factory.annotation.Value;
import org.springframework.stereotype.Component;

@Component("helloBean")
public class HelloBean {

	// <property name="name value="어노테이션" />
	// 이거랑 똑같은거다.
	@Value(value = "어노테이션")
	private String name;

	// <property name="printer" ref="stringPrinter" />
	@Autowired
	@Qualifier("strPrinter")
	private PrinterBean printer;

	public HelloBean() {
		System.out.println("Hello Default constructor called");
	}

	public HelloBean(String name, PrinterBean printer) {
		this.name = name;
		this.printer = printer;
	}

	public void setName(String name) {
		System.out.println("Hello setName() called" + name);
		this.name = name;
	}
	public void setPrinter(PrinterBean printer) {
		System.out.println("Hello setPrinter() called" + printer.getClass().getName());
		this.printer = printer;
	}

	public String sayHello() {
		return "Hello" + this.name;
	}

	public void print() {
		this.printer.print(sayHello());
	}

}
그리고 springbeans.xml파일
이렇게 해주면 각 클래스에 있는 컴포넌트 어노테이션을 자동으로 스캔해서... 객체의존성을 주입해준다..
이게 전략2이다.
	<!--  DI전략2의 Component Auto Scanning 설정 -->
	<context:component-scan base-package="myspring.di.annot" />
테스트소스;
package myspring.di.annot.test;

import org.junit.Assert;
import org.junit.Test;
import org.junit.runner.RunWith;
import org.springframework.beans.factory.annotation.Autowired;
import org.springframework.beans.factory.annotation.Qualifier;
import org.springframework.test.context.ContextConfiguration;
import org.springframework.test.context.junit4.SpringJUnit4ClassRunner;

import myspring.di.annot.HelloBean;
import myspring.di.annot.PrinterBean;

@RunWith(SpringJUnit4ClassRunner.class)
@ContextConfiguration(locations = "classpath:config/springbeans.xml")
public class HelloAnnotationBeanTest {

	@Autowired
	HelloBean hello;

	@Autowired
	@Qualifier("stringPrinter")
	PrinterBean printer;

	@Test
	public void hello(){
		//System.out.println(hello.sayHello());
		Assert.assertEquals("Hello어노테이션", hello.sayHello());
		hello.print();
		Assert.assertEquals("Hello어노테이션", printer.toString());
	}

}
constructorINjection
package myspring.di.annot;

import org.springframework.beans.factory.annotation.Autowired;
import org.springframework.beans.factory.annotation.Qualifier;
import org.springframework.beans.factory.annotation.Value;
import org.springframework.stereotype.Component;

@Component("helloBean")
public class HelloBean {

	// <property name="name value="어노테이션" />
	// 이거랑 똑같은거다.
//	@Value("어노테이션")
	private String name;

	// <property name="printer" ref="stringPrinter" />
//	@Autowired
//	@Qualifier("stringPrinter")
	private PrinterBean printer;

	public HelloBean() {
		System.out.println("Hello Default constructor called");
	}

	@Autowired
	public HelloBean(@Value("생성자어노테이션")String name,
					 @Qualifier("stringPrinter")PrinterBean printer) {
		this.name = name;
		this.printer = printer;
	}

	public void setName(String name) {
		System.out.println("Hello setName() called" + name);
		this.name = name;
	}
	public void setPrinter(PrinterBean printer) {
		System.out.println("Hello setPrinter() called" + printer.getClass().getName());
		this.printer = printer;
	}

	public String sayHello() {
		return "Hello" + this.name;
	}

	public void print() {
		this.printer.print(sayHello());
	}

}
package myspring.di.annot.test;

import org.junit.Assert;
import org.junit.Ignore;
import org.junit.Test;
import org.junit.runner.RunWith;
import org.springframework.beans.factory.annotation.Autowired;
import org.springframework.beans.factory.annotation.Qualifier;
import org.springframework.test.context.ContextConfiguration;
import org.springframework.test.context.junit4.SpringJUnit4ClassRunner;

import myspring.di.annot.HelloBean;
import myspring.di.annot.PrinterBean;

@RunWith(SpringJUnit4ClassRunner.class)
@ContextConfiguration(locations = "classpath:config/springbeans.xml")
public class HelloAnnotationBeanTest {

	@Autowired
	HelloBean hello;

	@Autowired
	@Qualifier("stringPrinter")
	PrinterBean printer;

	@Test
	public void 전략2_컨스트럭터() {
		Assert.assertEquals("Hello생성자어노테이션", hello.sayHello());
		hello.print();
		Assert.assertEquals("Hello생성자어노테이션", printer.toString());
	}

	@Test @Ignore
	public void 전략2_세터(){
		//System.out.println(hello.sayHello());
		Assert.assertEquals("Hello어노테이션", hello.sayHello());
		hello.print();
		Assert.assertEquals("Hello어노테이션", printer.toString());
	}

}
자 이제 전략2에서의 Setter Injection과 constructor Injection 을 전부 실습함
추가적으로...
아래와 같이 쓰는 방법도 있다.
1. values.properties파일을 하나만든다.
name=\uC804\uB7B52\uC5B4\uB178\uD14C\uC774\uC158
printer=stringPrinter
이후 hellobean.java클래스에서 아래와 같이.. value어노테이션 안에 ${name} 과 같이 써주고..
package myspring.di.annot;

import javax.annotation.Resource;

import org.springframework.beans.factory.annotation.Autowired;
import org.springframework.beans.factory.annotation.Qualifier;
import org.springframework.beans.factory.annotation.Value;
import org.springframework.stereotype.Component;

@Component("helloBean")
public class HelloBean {

	// <property name="name value="어노테이션" />
	// 이거랑 똑같은거다.
	@Value("${name}")
	private String name;

	// <property name="printer" ref="stringPrinter" />
//	@Autowired
//	@Qualifier("stringPrinter")
	@Resource(name="${printer}")
	private PrinterBean printer;

	public HelloBean() {
		System.out.println("Hello Default constructor called");
	}

//	@Autowired
//	public HelloBean(@Value("생성자어노테이션")String name,
//					 @Qualifier("stringPrinter")PrinterBean printer) {
//		this.name = name;
//		this.printer = printer;
//	}

	public HelloBean(String name, PrinterBean printer) {
		this.name = name;
		this.printer = printer;
	}

	public void setName(String name) {
		System.out.println("Hello setName() called" + name);
		this.name = name;
	}
	public void setPrinter(PrinterBean printer) {
		System.out.println("Hello setPrinter() called" + printer.getClass().getName());
		this.printer = printer;
	}

	public String sayHello() {
		return "Hello" + this.name;
	}

	public void print() {
		this.printer.print(sayHello());
	}

}
springbeans.xml파일에서 그 프로퍼티즈 파일에 이렇게 연결해주면... 실행이 잘 된다
	<!-- Properties 파일 만들것이다. -->
	<context:property-placeholder location="classpath:config/values.properties"/>
'Dev > [Java]' 카테고리의 다른 글
| [Spring] 4. DI전략 3단계 (0) | 2021.02.01 |
|---|---|
| [JAVA공부] 이클립스 단축키 정리 (0) | 2021.01.30 |
| [Spring] 1. 라이브러리와 프레임워크의 차이점? DI전략1 (0) | 2021.01.29 |
| [DBMS] 9. Web 붙이기, Servlet / JSP - 직접해보기 (0) | 2021.01.28 |
| [DBMS] 8. Web 붙이기, Servlet / JSP (0) | 2021.01.28 |


